
TECHNOLOGY INTEGRATIONS
& PARTNERSHIPS
- Atlassian
- AWS
- Appfire
- Tempo
- Carahsoft
- ...and more!
When using Jira in a large organization with thousands of users, the way you administer and maintain it has to change. You will need to rethink both how you handle the IT architecture and how you manage your instances. This paper will present you with a few approaches to some of the common pain points that we have seen in large-scale Jira implementations with our enterprise clients.
If your organization is growing at a consistent pace, at one point or another, you will likely face issues of scalability with your Atlassian environment. Jira, in particular, must be transformed and adjusted to fit the needs of the many, rather than the needs of the few. Isos Technology has helped many customers scale Jira, and what we’ve learned along the way is that organizations need to have a solid plan that includes governance, server configuration, establishing user roles, and training. In this whitepaper, we will explore each of these topics and how best to achieve success in your overall quest to scale Jira.
While it may seem a bit recursive, Jira and Confluence are ideal tools for documenting and tracking changes to how we configure and use our Atlassian tools. We usually see governance teams for large Jira instances using Jira Service Management for change requests. Given that most requests originate from users who are already using Jira at the organization, having a plain old Jira Project works very well, too. In addition to tracking requests for changes to configurations in Jira, we recommend having a staging environment for Jira. This is extremely helpful in validating aggressive changes to configurations, trying out new Apps, reorganizing Projects, and rehearsing upgrades.
Once you have your Jira Data Center environment up and running properly, the most important thing to keep under control is your list of Jira administrators. In Jira, the majority of higher-level functions (such as modifying Workflows, adding Custom Fields and modifying Schemes) require Jira administrator privileges. This is for good reason. The loosely-coupled nature of Jira objects is what allows for the high degree of customization and reuse, which makes Jira a powerhouse. Jira administrators need to be deliberate and trained in their administrative capabilities.

Unfortunately, it is often easy to grant Jira administrative privileges “for just one change that I can do myself”… and then another… and then another. Soon, you have too many users with Jira administrative permissions, and a growing list of system issues and probably multiple high-priority system incidents (P1s).
This is especially prevalent when Jira was introduced to one or two teams before scale was a consideration. Maybe Jira was just “on a server running under a desk” for a small team where they considered it acceptable for everyone to have admin access. As more teams and people were added in, they were made admins, as well. Then this group of admins was carried over to the scaled environment, and the process of adding ad hoc admins was allowed to continue.
This is a recipe for disaster in any environment, more so in a scaled environment. You need to come up with strict policies on who should be made a Jira administrator. This list should be very short, and everyone on the list should receive training in Jira administration.
---
As part of this mindset, you will need to create a team to administer Jira. In a scaled environment, a “team” should never be a single person. They will quickly become overwhelmed with user requests. You should also make sure to invest in the continued training for this team since Jira is constantly evolving.
The obvious choice most people make when creating their Jira administration team is to stick to technical resources who will also have System Administrator privileges. While it is a very good idea to have someone who can diagnose system problems on the team, it is also a good idea to have team members with backgrounds in business analysis to help Project teams design the best Workflows, Custom Fields, and Schemes. This is where the majority of your changes to your Jira instance will occur. A background in managed services and QA is also desirable for team members.
With Jira administrator privileges restricted, your users will need a way to ask for changes. Fortunately, now that Jira is running you have the perfect place for this. While you may create a couple of test Projects to make sure your Jira production environment is configured properly, your first “real” Project should be a Jira admin request Project.
This Project should be in place before you make Jira available to the larger user base because you will be getting a lot of requests at the start. This Project should handle all aspects of Jira administration. It shouldn't just be used to raise problems with Jira. Users should be able to request new Projects, Custom Fields, Workflows, and any other functionality that falls under exclusive Jira administration functions. It is also a good idea to include training as an Issue Type users can raise. To aid in cultural adoption of Jira, having readily available access to training will aid in team adoption.
While a normal Jira Project will suffice for your admin Project, a Jira Service Desk Project is ideal. Having simple, intuitive Request Types will help users request the right functionality and will help your Jira administration team fulfill requests more effectively.

Jira is very good at balancing customizations for specific teams' work styles while preserving team autonomy.
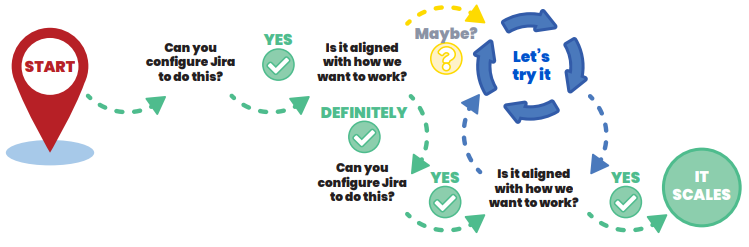
Atlassian has a heavy emphasis on understanding and activating teams. This emphasis has an impact on how Atlassian tool governance works, and in particular how deploying Jira at scale works. This diagram, derived from the Hoshin Kanri Catchball model, is a helpful way to contextualize how Jira administration is done at scale.
While Jira administration can be very top-down oriented in a smaller instance, in a large instance we are biased toward adjusting our Project configurations to the specific needs of the teams.
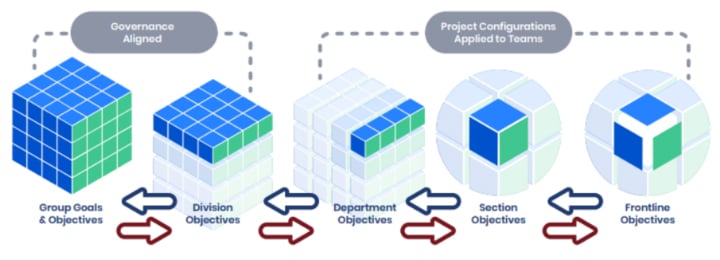
This model helps us understand how we can derive common Jira configurations we use for departments, sections, and even frontline teams so that the Project configurations we provide are both easier to maintain while matching how our teams actually work.
When evaluating feedback from our teams, it's very important to understand the level of commitment the person who's providing the feedback has, based on their roles and responsibilities within the teams affected by the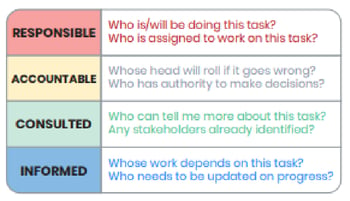 changes. We want to avoid configuring Jira Projects based on the Highest Paid Person's Opinion (HiPPO) model.
Using a RACI model, described here, allows us to contextualize and prioritize feedback because it associates the feedback with how the person's activities are impacted by the change.
For example, on a typical software development team Project, stakeholders are informed, and subject matter experts are consulted. So any configuration changes that they request will be considered less relevant than people in the responsible role (like actual software developers, QA staff, UX/UI experts, and analysts) or accountable (the Project owner or Project manager).

Out of the box, Jira’s rich feature set and configurability give it the ability to meet a wide range of organizational needs. However, the time always comes when you will need more functionality. Fortunately, Atlassian has supplied a rich set of APIs to expand Jira, which exposes greatly enhanced functionality. As a result, Atlassian has an extensive ecosystem of third-party Apps for all of their tools. It is important to follow a deliberate process when installing new Apps in Jira. There is both a cost and performance impact to adding new Apps.
Cost is the first consideration many organizations take into account when purchasing new Apps. These can vary widely based on exposed functionality and vendor. Pricing is based on the total number of Jira users, not just the users who will be using the App. For example, if an HR department needs an App that will only be used by five people but the Jira instance has 1000 licensed users, the pricing will be based on the 1000 user number, not the five.
A second consideration to make when purchasing Apps is the overall effect on system performance. Every App you add to Jira uses the same system resources as the base Jira installation. This means that every App, to one degree or another, impacts overall system performance. Over time, you may experience degraded performance, whether from the impact of a few resource-intensive Apps or the thousand cuts of an overabundance of smaller Apps. When looking into performance issues in a Jira instance, Apps should always be one of the first parts of the environment that is scrutinized.
An often overlooked but vitally important consideration when purchasing Apps is the need for Jira administration. While many of the features found in Apps may be exposed to Project administrators and normal Jira users, most Apps require Jira administrator privileges to configure. Every new App that is installed has the potential to drain away time from your Jira administrator team over the course of the App’s existence in your ecosystem.
To ensure a positive App experience, the first thing you should do is wrap a good governance process around Jira Apps. Requesting new Apps should be part of an overall Jira Project set up to help with the administration of Jira. It could even be argued that administering Jira Apps should have its own governance Project. Anyone making a request for a new Jira App should provide a business case for the App.
There are several questions the requestor needs to address:
The first question is often the easiest to answer, since they wouldn’t have proposed the App without a need within their business. The second question may be more difficult for the requestor to answer because they may not know how other parts of the business function or what their needs are. This may require legwork on their part, but is essential due to the cost of the App being based on the total Jira user count. This leads directly into the question of budget.
Will the business unit be responsible for the cost of the App for the first licensing year? For the entire lifecycle of the App in your environment? Is there a general bucket for App costs across the organization? The model varies across organizations and there isn’t a single standard.
While having a business unit pay for the App will make them consider more carefully what they are requesting, it may prevent them from asking for vital features they need in Jira. This can lead to lack of adoption of Jira and potential fragmentation of information across disparate tools.
Finally, establishing the owner of an App is probably the most overlooked question when adding new Apps. While the easy answer is to say that the Jira administrators are the owners of all Apps, this is seldom correct. True, Jira administrators will be responsible for administering an App. They are not the experts, however, on whether an App is still in use and how it is being used. The owner of an App should be a point of contact for Jira administrators when they have questions on current business usage of an App. Owner information should be maintained, transitioning to a new owner when the current owner leaves the team or organization.

After the App goes to production, make sure your users follow your governance process for configuration changes to the App. They should create tickets in the Jira Project where you manage your Apps for configuration changes requiring Jira administrator privileges. Avoid the temptation to temporarily grant Jira administrator access to users so they can configure their own Apps. It is also a good idea to make sure that all tickets related to one or more Apps use either (1) Components (2) Labels or (3) a Custom Field. Labels are the easiest to use, but are the most error-prone without some from of label fencing App to control available Labels. A Custom Field is easy to set up, and works well if the Apps are part of the Project used to govern other parts of your Jira environment, but it's not optimal. Project Components are a great choice for a Project dedicated to App governance.
It is best to see if you can align the licensing of the App with other Jira Apps. This will make App renewal simpler across the board. Prior to renewal, verify with the App owner to make sure their business unit is still using the App. If they aren’t, you should also check across the business to see if it is in use by any other users.
Before upgrading or removing an App, make sure to test on a non-production environment. This is especially important when upgrading an App as there may be performance or functionality changes.
Make sure to coordinate all of this with communications to your Jira users, and include an update in your knowledge base.

Once you’ve figured out your initial node architecture, you will need to start planning how you are going to spin up your servers. There is no one single standard on how to architect your environment—it will vary from organization to organization. Maybe you are forced to run bare metal servers, or maybe you are fully ensconced in AWS or GCP. You may run Windows or Linux. Your organization might already be heavily invested in orchestration software or new to tools like Ansible.
Whatever the case, there are questions and considerations that should be taken into account before actually spinning up servers.
First, since you are operating at scale, you will need dedicated environments. At a minimum, you should have development, stage, and production environments. While it is okay to have your development tier differ from your production tier, you should try and mimic production as closely as possible. Stage, on the other hand, should be as close as possible to your production environment. Remember, stage environments are your final sanity check before production.
These are the minimum considerations for your Atlassian environments. It is often a good idea to have the ability to instantiate multiple development environments in an ad hoc manner. One environment could be dedicated as a sandbox for your users to test out changes to Workflows, Schemes, Custom Fields, and other features that they are not able to directly modify in production due to permission restrictions. A second development environment could be dedicated to testing out API calls, third-party integrations, and Apps. A final development environment could be reserved for testing out newer versions of Jira as dictated by your organization’s change management processes. You may also need to create instances for specific business units to test.
Regardless of how many environments you choose to have, you should configure your orchestration with enough flexibility to add new environments in the future. One of the biggest problems organizations get into is using orchestration that is so static that they can’t accommodate changes without substantial rework, costing significant time and resources.
Additionally, you’ll want to ensure that your orchestration process is well documented. This sounds like common sense, but documentation is often neglected. Far too frequently, the information required to properly create environments is partially documented and partially retained in the head of an IT resource. From an organizational standpoint, this is a significant risk.
When working through creating environments, you will also need to consider how those environments are populated with data. The standard approach is to populate lower environments with copies of production data. This is the simplest case, but also one with a hidden danger. Often, development environments have looser restrictions on admin privileges, which allow users to experiment with Workflows, Schemes, and Custom Fields before requesting production changes. Unfortunately, this can easily lead to a scenario where users are able to access data they normally wouldn’t be allowed to see, such as HR tickets. When copying data between environments, you must be very careful with permissions and should consider scrubbing data, such as not copying sensitive Projects into certain environments.
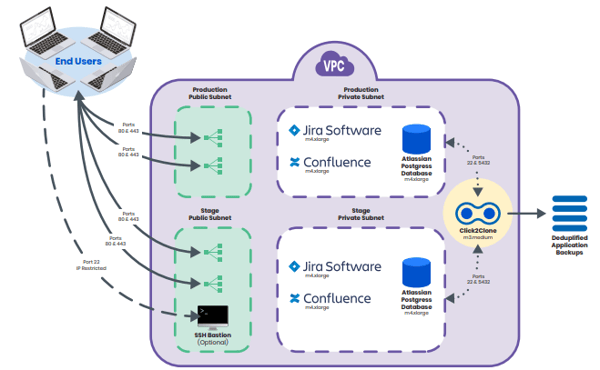
Another common strategy for new environments is to only pull over a subset of Projects. There are several Apps in the Atlassian Marketplace that make this process easier. As an added bonus, these same Apps will help you promote Projects and Jira artifacts between environments. This is very useful when teams are testing out Workflows, Schemes, and Custom Fields in development environments. If you use one of these Apps, you will need to wrap a change management process around promotion, leveraging your stage environment.
High Availability
Scaling Benefits
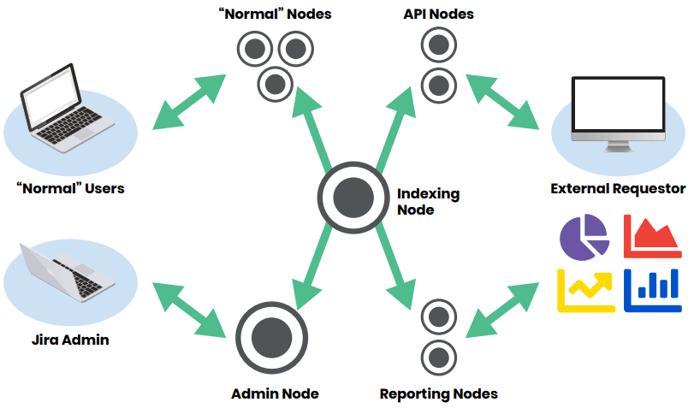
So you’ve decided your organization needs to run Jira at scale in your own infrastructure. As with any new application, there are decisions made early on that can greatly improve the success and longevity of your environment. The first big decision is to define the Jira node architecture. This is not defining server specifications (e.g. number of processors, memory, etc.), nor is it defining the full networking structure—that will come later. You want to avoid the anti-pattern of lumping all of your Jira functionality into clusters of identical nodes. When issues such as high memory usage occur, you may respond by adding or beefing up the existing nodes instead of addressing core usage patterns. The preferred approach is to take a comprehensive view of Jira usage patterns and define node groups to handle different use cases. A common pattern for breaking up nodes into clusters is to have a 3-node group: (1) admin nodes (2) API nodes (3) general usage nodes.
Jira admin functions should only be performed by a small group of users. As such, this will be one of the smaller node clusters. This cluster allows admins to work freely. If another cluster needs to be taken down, your admins will not be impacted. Also, many admin functions suggest a reindex once completed. Reindexes can be long running processes that impact performance. By performing the reindex on a dedicated cluster and then pushing the indexes to the other nodes, you will minimize the impact on the main group of end users.
The second node cluster should be for API access. This is where third-party systems, such as the accounting or HR platform, will make direct calls into Jira when needed. It is common for API calls to be resource-intensive operations. The benefit of having a dedicated API cluster is to ensure uninterrupted access for your end users that a resource-intensive or runaway API call can cause. Additionally, if API calls only happen during certain times of the day, it is very easy to scale this cluster up and down in anticipation of these planned events.
The final cluster of nodes should be for general usage. This is the everyday Jira usage the environment was built to support, and will be the most used part of any scaled Jira environment. With the offloading of other functions, end users will see greater and more consistent performance. By monitoring usage patterns of these nodes over time, you will even be able to see when more nodes should be added to the cluster and scale to correspond with this usage.
These are not the only functional usage patterns that may be seen as every organization is unique. However, these are some of the most common patterns that are seen. The node clusters are fairly easy to define and manage. You should be monitoring and periodically re-evaluate how your organization is using Jira, and plan accordingly. The key tenet is to not have one big cluster, but to define specific sets of nodes dedicated to Jira usage patterns, which will allow you to scale up/down and maximize resource utilization where it is needed.
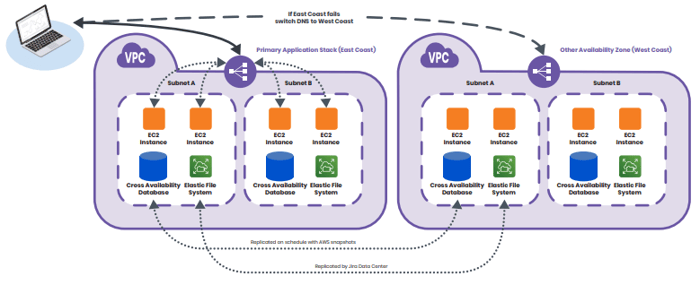
Keep in mind that high availability is not the same as disaster recovery. While Jira Data Center was created to provide a scalable, highly-available Jira solution, you will need to work through your own disaster recovery model. Fortunately, if you have figured out good orchestration strategies, you will be a step ahead. You can use these strategies along with regularly-scheduled backups when disaster strikes. Regardless of how you are backing up Jira and orchestrating environment creation, test your backups regularly. While once a month may be too aggressive, doing this less than once per quarter significantly increases risk. Testing your disaster recovery should be more than just making sure servers come up and you are able to see the dashboard. You should approach testing the environment the same way you would handle any UAT, with multiple users and use cases verifying the system.
Before you set up your servers, consider how you will handle monitoring and reporting. While you can put tools in place once your environments have been configured, it is best to take these into account from the start.
First, figure out how you will be doing your log aggregation. You will have multiple nodes with multiple log files, so quickly finding the information you need in log files is essential when issues occur. Whether the issue is a P1/Sev1 or is simply a report of erratic behavior, a tool like Splunk will aid your Jira system administrators when the time comes.
Second, consider what you will be using for monitoring and reporting. You will want a tool that provides dashboards which can show current and historical system health at a glance. You’ll also want to monitor standard metrics like CPU utilization, VM health, server response times, and server uptimes. Don’t limit yourself to these metrics, however. Consider monitoring things like concurrent users, issue and Project counts. Having these statistics readily available can help you plan node buildout and scaling before issues occur. A good tool for this is Prometheus.
Also, make sure you have an alerting mechanism, such as Opsgenie, in place for when server issues occur. This is arguably one of the most important things to implement from the system side when scaling Jira. You need to respond quickly to slowdowns and outages with a tool that allows you to configure notification thresholds and strategies.
Finally, consider how your users will be able to find out about overall system health. While you can make some use of the Jira banner to convey limited information to users, this is not ideal. Consider using Statuspage to give your users up-to-date information on the system. this will save you time fielding issues that will otherwise be raised.

Knowing the difference between Jira user groups and Project roles is essential to scaling your instance. While the distinction is a simple one, many people get them confused. At their simplest, Jira user groups are global, cross-cut groupings of users. If a user is in a Jira user group, they are in that group for every Project. Project roles, on the other hand, are more granular, allowing you to provision users at the individual Project level. Just because a user is in MY-PROJECT-ROLE in one Project does not mean they have that role in another Project.
You should make sparing use of Jira groups. In a scaled environment, these should be controlled in your directory solution (e.g. LDAP, Active Directory, etc.). Of course, this also means that the team managing your directory has additional administrative overhead, both during onboarding and offboarding users.
Additionally, if users need to be added to/removed from groups during the course of their association with your organization, your directory managers will need to be involved.
Project Roles, on the other hand, are managed by individual Project administrators. If a Jira user needs to be added to or removed from a role for a Project, it is a simple matter for the Project administrator to make the appropriate changes. While simpler to administer, be careful to not go wild creating Project Roles. Because members don’t carry over from one Project to another, having Project Roles with intuitive names for your
organization will make it easier for reuse. Using common names is especially important in helping lay out shareable Permission Schemes.
As a final note, try to avoid adding default members to Project Roles. If a Project Role has default members, those users will have that role in ALL Projects. This can lead to unexpected behavior and may cause administrative headaches.
Invest in training your admins—don't wait for admins to ask for this
Use a lean approach to training teams leaders and users
In general, cleaning up after deactivated users is not that difficult. Issues they have been involved in will still be in the system. The history of their work and their comments will remain. However, there are some areas that you should make sure you clean up as part of the offboarding process.
First, if they are the owners of any Projects, ensure those are transitioned to another user. Though this function does not have to be done prior to offboarding, it is a good idea to do it early so the Project continues unimpeded.
Next, validate that the user is not part of any Notification Schemes. This is especially important if you have granted access to external vendors. While employees that are no longer part of your organization may no longer be able to access their corporate email, third-party vendors may have had their notifications going to addresses that are outside of your control. There may also be places in your system where users receive additional notifications, because of Apps that allow for Workflow transitions to send notifications. You may need to track down these instances outside of the Notification Scheme changes. As with Projects, you can make these changes after offboarding, though earlier is better.
Finally, change the ownership of shared dashboards, boards and filters that belong to the deactivated user. This ends up being one of the biggest headaches when users no longer have access to Jira. If you don’t address this while the user is still in the system, you will have to use third-party Apps, database magic and complex admin processes to clean these up.
Scaled Jira configurations will result in a better user experience: